Menu
Publishing to iOS App Store
The iOS App Store is the most restrictive platform with many rules to follow, both technical and policy. You will need to understand Apple’s policies because your app will be reviewed by a person in the Apple app review team, before it can be published. In general, this means providing a good quality app, avoiding anything that infringes user privacy or safety, and not trying to bypass any restrictions. Apple’s perspective on this is often more restrictive than general business rules.
This process has many steps and can take time, so allow for this in your deployment schedule.
To get all the information you need for an Apple App Store build and submission, you must create an Apple Developer Account and sign up to the iOS Developer Program.
Notes:
- some parts of the publishing process can be followed in parallel. For example, a developer can create the certificates required, while a marketing or sales person creates the app and defines it’s app store information in the Apple App Store Connect portal.
First time, yearly renewal, and simple updates
The first time requires much setup including accounts and certificates.
After this, many steps can be skipped for simple app updates, except that Apple requires distribution certificate and mobile provisions to be renewed yearly.
Required tools
Some steps can be easier with a Mac, rather than a Windows PC.
On either Mac or Windows, you can do the certificate operations with openssl. While complex, this tool makes all the steps explicit, whereas a Mac has some hidden or quirky behaviours that could catch you out. If you feel comfortable with command line tools, consider using openssl.
You can download OpenSSL from the OpenSSL site.
First time setup
Apple Developer Account
First, create an Apple developer account
- This requires an Apple ID. We suggest creating a generic email address for your company such as appledev@mycompany.com, rather than a specific person; this avoids challenges when that person moves on or changes role.
- This requires payment each year and a registered DUNS number.
Application Identifier (Bundle ID)
- In the Apple Developer portal select Identifiers
- Create a new ID with the + button and select App ID.
- This is a bundle ID usually following the pattern com.<companyname>.<applicationname>
- It is important to use something you are willing to keep permanently, as it will identify your application to Apple. Don’t use clever brand names that you might need to change later.
- Most apps don’t need any of the special capabilities.
Creating the App
You can now go into Apple’s App Store Connect and create a new App with the + button. This will ask you for basic information such as platforms and name. The Bundle ID should be the identifier you already created in the developer portal.
For the remaining information, you can follow Apple’s Submitting to the App Store information. There are many required pieces of information required, including such things as screenshots and videos, privacy information, market availability, and export declarations.
Certificate Signing Request
The very first time you setup your Apple account for iOS distribution, you need to create a “Certificate Signing Request” or CSR.
This CSR is the root identification for your organisation to Apple, so you only create this once, and you must not change it, or lose the files involved.
Creating CSR on a Mac
Open Applications > Utilities > Keychain Access
- Menu > Keychain Access > Certificate Assistant > Request a Certificate from a Certificate Authority.
- Enter your email address and name for the certificate and select Saved to disk (this will mean the CA email is not required).
- Click Continue.
- Save the .csr file somewhere safe.
- This CSR file refers to a private key, but this will be saved along with the P12 file later.
Creating CSR with OpenSSL
Open a command prompt to the OpenSSL directory and enter the following commands
openssl genrsa -out mac_private.key 2048
openssl req -new -key mac_private.key -out mac.csr -subj "/emailAddress=YOUREMAILADDRESS, CN=APPNAME, C=COUNTRYCODE"
Note: Replace the CAPITALIZED text above with relevant information for your app.
This will create a mac_private.key and mac.csr file which are needed below. Save the .csr and .key file somewhere safe.
First time or yearly renewal
The following steps are done the first time when you setup, and also must be renewed each year, by Apple requirement. This includes the distribution certificate, and the mobile provisions which link to it. Apple will send you email when these are expiring.
iOS Distribution Certificate (.cer)
Based on the CSR created initially, you create an “iPhone Distribution” certificate for use with the App Store, renewed yearly.
Log into the Apple developer site and go to Certificates.
- Click the + button to create a new certificate.
- Select “ios Distribution (App Store and Ad-hoc)” and click Continue.
- Upload your certificate signing request you made above and click Continue.
- Download the new developerID_application.cer file.
- Save the .cer file somewhere safe.
Exporting the Distribution Certificate (.p12)
Now the certificate has to be exported into a “Personal Information Exchange” or P12 file.
This will involve a new password you make up. It is very important to keep this password along with the P12 file, both for use in Umajin Publishing system, and for future usage of the certificate.
Exporting to p12 on a Mac
Renewing on a different Mac?
If you are using a different Mac to the one used to create your certificates before, then you must first import the previous year’s .p12 file. This will import the private key required.
In Mac Finder:
- Double click the previous .p12 file to import it into Keychain.
- You will need the password used to create the previous P12 file.
- It does not matter if this certificate shows as expired.
Export the Certificate (.p12) on Mac
In Mac Finder:
- Double click the .cer file to import it into Keychain.
Open Applications > Utilities > Keychain Access:
- Select Certificates in the tab bar (or side bar in older MacOS).
- The All Items view will not work!
- Find the “iPhone Distribution: <your company>” certificate
- If it shows as untrusted, you may need to update the Apple WWDR Intermediate certificate first.
- Right click and select export
- Select the File Format “Personal Information Exchange (.p12)”
- If you do not have this option, Keychain Access does not have the private key you used in the CSR. See the steps above about renewing and importing the previous p12.
- Enter the password you have chosen for the P12 file.
- Save this password for entry into Umajin publishing system below.
- Save the p12 file.
Exporting the P12 file with OpenSSL
This process involves two steps. There is an intermediate .pem file. Enter the following commands:
openssl x509 -in <filename>.cer -inform der -out temporary.pem
openssl pkcs12 -export -in temporary.pem -inkey mac_private.key -password pass:"<new password>" -out <filename>.p12
Substitute <filename> for the filename of the CER file you got from Apple, and <new password” for the p12 password you have chosen.
iOS Provisioning Profile(s)
Now you need to set up Mobile Provisioning profiles for the app. You will probably need two: one is for testing on your devices, and another for publishing to the App Store.
These need to be made the first time, and then renewed each year as they are based on the certificates you created above.
You likely will want to change the testing profile more often to add new test devices.
App Store Distribution Profile
- Navigate to https://developer.apple.com/account/ios/profile/production
- Select “Profiles” in the left hand sidebar.
- Click Generate a Profile
- Select the “App Store” option and continue.
- Select the App ID that you created in the App Identifier section (above) and continue.
- Enter your app name as the profile name, and continue.
- Click Generate.
- Click Download
- This will generate a .mobileprovision file for your application which you will download.
Testing devices and profile
We strongly recommend you test your app on an actual iPhone and/or iPad before publishing to the App Store.
Test devices
In your Apple developer account, go the Devices section, and add your test device or devices.
For each device, you will need it’s unique ID, or UDID. Finding the UDID requires connecting the device to a Mac or Windows computer.
- Windows: This can be found by connecting the device to iTunes, and clicking “Show Phone Info”. At first you will see only the serial number. Click on this number and it will change to the UDID, which is a long string like “fde10b2d1304366f5c38429b1af80ed10fc5b630”. Right click and select Copy.
- Mac: Connect the device and select it in Finder. Under the name at the top, click on the “Model… storage .. battery” status line. It will change to show the UDID. Right click and select Copy UDID.
Testing (ad-hoc) provisioning profile – First time and each year
Next, you need to add the test devices into a provisioning profile created specifically for testing; as for the app store profile above, go to Profiles and Add a new profile.
- Choose “Ad-hoc”.
- Choose the app and certificate as before.
- Finally, select all the devices you want to test with.
- Once completed, download the .mobileprovision file. You will need this to submit to Umajin’s cloud system.
Checklist: iOS Publishing Requirements
You should now have the following items ready to use with Umajin for publishing to the iOS AppStore.
- ios_distribution.p12 file
- password for the .p12 file
- a distribution .mobileprovision file
- a testing .mobileprovision file
Preparing publishing assets
For the most part, Umajin will package your project files as required. Some special files are involved, as below.
Icon
Umajin Editor can generate the specific icon images required by Apple, in the publishing process below. However you will need an appropriate source image.
The usual guidelines for designing icons apply, such as:
- using simple stylized shapes and colors
- avoid detailed or photo realistic images.
- avoid text
- not the same as a logo
- avoid anything that could be confused for another app or brand.
Launch image
While your app is loading, a static launch image will be shown. If it is a large app, or an old phone, this can be a noticeable amount of time.
You can choose to have Umajin Editor generate the splash screen from a page, or you can override it by supplying a splash image as follows:
Splash image: manifest/ios/splash.png or splash.jpg
Screenshots
When you publish your app on the App Store, you will need screenshot images. You can make these yourself, or use Umajin Editor to generate them from your pages if suitable.
Native Libraries
If you have integrated native libraries (name.framework folder) into your app then they should be placed in the following location:
Frameworks: manifest/ios/Frameworks/<yourlib>.framework/...
Publishing process
To begin, use Umajin Editor’s menu: File > Publish… and select Publish to Stores. Umajin Editor will show the “Publish to App Stores” screen.
- Choose your app icon image for the Android and iOS Icons.
- Choose a page for the Launch Image. (You need to do this, even if overriding it with an image in manifest/ios.)
- Choose at least one page for a screen shot.
Once available, click Next. Wait while the editor processes and saves the project. Once complete, you will see the Publish images exported dialog.
Click OK, and the process will continue in the cloud.
Cloud – Publish information
First, select the operating systems you want to target. In this case, select Apple iOS, and click Next.
Cloud – Apple iOS Information
In the Apple iOS section, enter the identification and certificate information that you have collected. Not all of this is required, depending on what your app does and what you are doing (testing or publishing).
- iOS App Name: the name as it will appear on device. By default it is the same as your project name at time of publishing.
- Bundle ID: enter the application bundle ID. Once you have published with this ID, you cannot change it.
- Version: the version number of the app to be released. This is your own version number, and separate from the user-visible version number on the app store.
- Obviously you should normally keep this version matching the app store version for clarity.
- However, this version must change each time you submit for review. Therefore, we suggesting adding .1, .2… etc on the end when resubmitting a rejected app.
- Google Maps iOS Key: required only if using Google Maps component.
- Google Maps Directions Key: required only if using Google Maps component.
- Code Sign Certificate: select the iOS Distribution certificate p12 file that you created.
- Code Sign Password: enter the password that you used to creat the p12 file.
- Apple Push Certificate: obsolete, ignore
- Apple Push Password: obsolete, ignore
- Distribution Provision Profile: select distribution .mobileprovision file that you obtained from Apple.
- Adhoc Provision Profile: select the testing .mobileprovision file that you obtained from Apple.
- Device Family Targeting: select whether you want your app to be available to iPhones, iPads or both. The app will not appear in the App Store of the devices you don’t select.
- Advertising ID Support: select Yes if your app uses the Advertising Identifier.
Click Next to save the data you have entered.
After entering data for any other platforms you want to distribute to (Android, Mac, Windows) you will reach the Confirm page.
Build process
Please contact Umajin to build the software after you have filled in the data above.
Packaging Output
Umajin will build an IPA for your app, either testing or publishing as you request.
If you selected testing, then the IPA will use the Adhoc Provision Profile and can be sideloaded onto your test devices as identified in the Apple developer portal. If you need to add new devices to test, you have to go through the process of adding a new device in Apple developer, making a new Adhoc profile, uploading it to Umajin and then building the software (phew!).
If you selected publishing, then the distribution provision profile will be used, and the IPA is suitable for publishing on the App Store.
You cannot test with the publishing IPA, and you cannot publish the testing IPA!
Testing – Sideloading
Sideloading refers to installing the app without going via the App Store. To sideload your testing IPA, probably the easiest way is:
- Windows: install iTunes
- connect the iPhone or iPad (and answer the trust questions on both iTunes and the device)
- select the device in iTunes
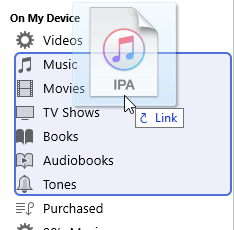
- drag the IPA file over the “On my device” section.
- Mac: use Finder (or iTunes before Catalina)
- connect the iPhone or iPad and answer trust questions
- select the device in Finder
- drag the IPA file over the device view.
- Other options include iMobileDevice or iPhone Configuration Utility
Note: The simple methods with iTunes or Mac Finder do not do upgrades, you must remove the app first before installing a new version.
Publishing to the App Store
Once you have tested and confirmed the app works correctly as a standalone app, request a publish build from Umajin.
You can now submit the resulting IPA file to App Store Connect as part of a release.
Creating a Release
You will need to create at least one release. This will have a version number that appears on the App Store. It does not have to match the version you used in Umajin’s systems, but it will be less confusing to keep them the same.
There will be some information to supply for each release, such as what has changed (the release notes).
Uploading the IPA
Once you have the app and a release created, you will need to use upload the IPA to Apple. The easiest way we have found to do this is using a Mac with the Apple Transporter tool. Login, then drag the IPA onto the Transporter window and click Deliver.
After you have delivered the IPA, there is a period of “processing”. Once this is complete you will receive an email from Apple. You can also check the status by going into the “Test Flight” section of App Store for your application.
After processing is complete, you can select the “build” IPA for your release.
Export Compliance Questions
When you select an IPA for release, the App Store will ask you to answer a serious of difficult questions around encryption export compliance. Use the following guidelines, which apply to the Umajin platform as a whole.
- Does your app use encryption? Yes. Umajin uses HTTPS (and other things like MD5)
- Does your app qualify for any of the exemptions […]? No. Generally Umajin apps do not qualify. You should check this if in doubt.
- Does your app implement any standard encryption algorithms […]? Yes. Umajin uses OpenSSL libraries.
- Does your app implement any encryption algorithms […] not accepted as standards […]? No. Umajin only uses standard encryption.
- Will your app be available in the App Store in France? Your decision.
Submitting the Release
After succesfully uploading the IPA you can submit the release for review.
In present times, review can be relatively quick, especially for updates; we often experience less than one day. For new or complicated apps expect more time.
You may receive a rejection, often for pieces of information that are missing. This does not prejudice your eventual approval, simply add the information and retry.
In the bad case, you may receive a rejection for quality or policy, such as that the app has crashes or UI problems, or doesn’t do enough, or appears to try and trick users. These are more challenging to resolve, and will require care in reading the guidelines and ultimately may require additional development work. Umajin can give general advice, but this is a dialog between yourself and Apple, and in the end they make the decisions for their store.
Updates
Once your first release is approved, updates are typically much easier to do and can proceed quickly.
But do note that, Apple expires both your Distribution Certificate and Distribution Profile each year. You will need to create new ones. You will receive an email from Apple when this happens, and also notifications in App Store Connect. You won’t need to recreate the CSR (Certificate Signing Request) but you will need to go into App Store Connect, make a new Distribution Certificate, and then use it to make a new Distribution Profile. See the above steps for guidance on doing this.