Menu
Nine Slice
Nine-slice, also known as 9-slice, is a way to preserve the edges of an image while scaling it to the
desired size.
This component is very useful where your image/button/background has special corners, drop shadow edges,
borders or other corner/edge features. Edge detail is retained even when the image is resized to fit a
certain space. It stops stretching of the sides of your image when you re-size it or it displays on
different devices.
Once the image has been nine-sliced then the example of a resized image below shows that all the edge detail is maintained.
Using the Nine Slice
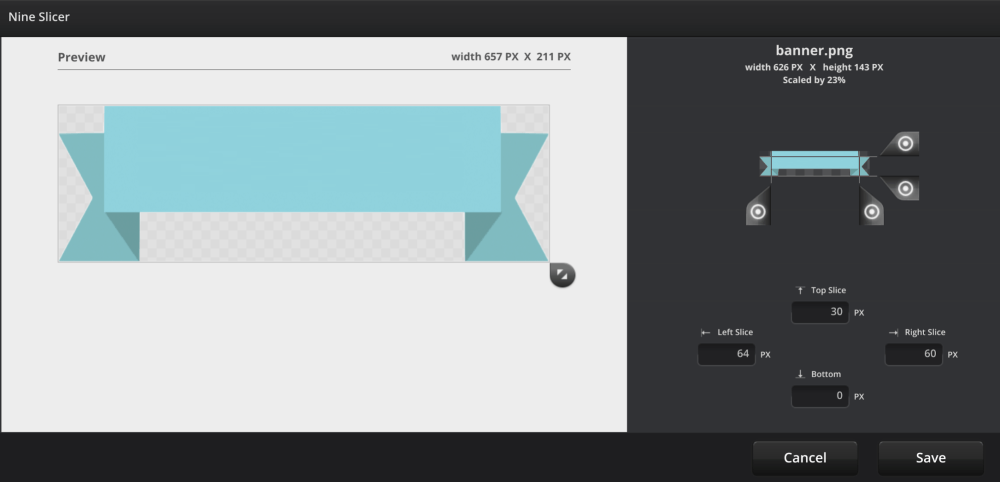
- The Nine Slice takes you straight to browse your project’s ‘images’ folder in order to insert the
asset you want to edit the slice values of. It inserts the asset into the Preview panel and the
Nine slicer. - The Nine Slice is pre-set to slice each side at 30 pixels. ( Distorted corners will result, for
example, when each dial is set to 0 pixels.) - Adjust the dials to preserve the 4 edges/corners of your image as you want them to display. You can
resize the preview image at any stage to check it retains the shape you want. Save the desired
result - These slice values can be reset at any stage, using the Nine Slice value button to edit the values
again and re-save.
https://help.umajin.com/nine-slice-tutorial/
Properties for Nine Slice Component
| Name | When components are placed on a page they appear highlighted blue in the scene tree and can be renamed by double clicking in this panel and typing the new name. Components can also be set to be visible/invisible on the page, using the ‘eye’ icon on this panel. |
| Position and Size | Sets position and size. As long as measurements are maintained as percentages it deals automatically with dynamic layout and resizing for different devices and orientations. You can use millimeters to control aspects of size like width or height in order to create an image thats size is maintained across devices. |
Appearance
| Image | This field is automatically filled with the image filename you selected initially. |
| Nine Slice Values | Clicking the “edit values’ button will take you to the Nine Slicer page. Change the sliders to preserve edges and corners in correct proportions and save the result. |
| Border Scale | Proportionally scales the sides, edges and corners of the nine slice image that are set in the editable values of the image used as a base for the component. |
| Border Padding | Pads the nine slice inside to outside the object bounds. This is useful when the nine slice object is snapped to another object and the border needs to be either internal or external of the bound object. Scales between 0 and 50. |
| Opacity | Set how opaque the image will display on a scale of 0 to 100, with 0 being transparent and 100 is completely opaque. |
| Tint | The color to apply on top of the image. The default is white. The tint works for white images, or white images with a black outline. The black will stay black, and the white will take on the tint color. If the image has color, the tint will mix the colors. For example, a yellow image, tinted blue, will turn green. |
Events that can Trigger an Action on the Nine Slice
Component
| On Press | Action occurs when component is pressed |

